Introduction
Hey there, home renovators and DIY enthusiasts! Ever thought about giving those well-trodden stairs a facelift? Maybe you’ve heard of Luxury Vinyl Plank (LVP) flooring but never considered it for your stairs. Well, stick around, because you’re about to find out why LVP on stairs is an idea worth climbing up to!
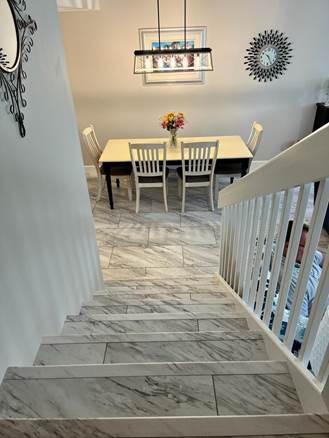
Contemporary LVP stone style over concrete stairs
Why Choose LVP for Stairs?
So, you’re playing with the idea of stair renovation, but still asking, “Why choose LVP for stairs?” Excellent question! First, let’s talk about the elephant in the room: durability. Look, stairs aren’t just a pathway between floors; they’re the daily stage of life. They endure stomping feet during morning rushes, paws skittering up and down, and the occasional (let’s be honest, frequent) trip or stumble. This is where LVP shines. It’s built like a tank but wears a tuxedo. It can handle the drama, the wear and tear, without losing its luster. Imagine a surface that’s more forgiving to a toppled vase or a fumbled cup of coffee. Yep, it’s a real game-changer.
But wait, there’s more! Have you thought about the visual impact? Stairs are often the unsung hero in your home’s overall look. They may not be the star of the show, but they play a vital supporting role. You wouldn’t cast an extra in a lead role, would you? LVP comes in a variety of styles, colors, and textures that can jazz up your stairs like a Broadway set designer. They can seamlessly blend with your existing home aesthetic or stand out as a stunning focal point.
And let’s talk dollars and cents. Renovating a house is no joke when it comes to costs. You’re going to love this part—LVP offers you the look and feel of luxury without making you live on instant ramen for the next six months. So, style, durability, and budget-friendliness? That’s why LVP should top your list for stair renovation. Intrigued yet? Keep reading!

Considerations Before You Dive In
Hold your horses, partner! Before you dive headfirst into this LVP pool, there are a few key considerations to mull over. Don’t worry; we’re not trying to burst your bubble, just handing you some floaties to keep you safe. So, what’s up first? Installation. While LVP is the DIY-er’s dream, let’s face it, stairs add a level of complexity that’s a bit like making lasagna—it looks simple until you’re knee-deep in layers. Measuring, cutting, angling; it’s not just laying it down flat. If you’re handy, great, but if not, maybe leave it to the pros.
Next, the slip factor. Stairs aren’t a place you want to skid. LVP tends to be slip-resistant, but it’s worth double-checking the specs to make sure your choice is up to snuff. And if you’ve got kids or pets, this isn’t just a “nice-to-have,” it’s an absolute must-have. Trust me; Fido and your toddler will thank you.
Let’s get to texture. With stairs, you want something that feels good underfoot, but also offers enough grip. LVP does provide options with different textures, so shop around a bit. You want the Goldilocks of staircases—not too smooth, not too rough, but just right.
Lastly, consider your home’s vibe. LVP comes in a smorgasbord of styles, so you’ll want one that harmonizes with the rest of your castle. Ready to take the plunge? Stick around; you’re just getting to the good stuff!
The Tools of the Trade
All right, you handy DIY aficionado, you’re revved up and ready to roll. But hang on a second, chief—do you have the tools for the job? Think of it like making a killer lasagna; you can have all the premium ingredients, but without the right kitchen gadgets, you’re just mixing chaos. So, what do you need in your toolkit?
Firstly, a good ol’ tape measure. Don’t just eyeball it, folks; stairs require precision. Next, we’re talking about a utility knife and a straight edge. You’ll be slicing and dicing those LVP planks, so you better make sure your cuts are clean. After that, you’ll need a rubber mallet. No, it’s not for stress relief (though it may help), but for securing the planks in place without damaging ’em.
Now, let’s get a tad technical with a stair nosing. This handy contraption helps you tackle the trickiest part—the edge of the stair. Make sure you get one that matches your LVP, okay? And then, we’ve got the adhesive. Yes, some LVP planks come with adhesive backing, but stairs are high-traffic areas, so don’t skip this. Get a solid adhesive that’s compatible with your specific LVP type.
Don’t forget those safety goggles and gloves. We’re talking stairs here, people, not a sandbox. Safety first! You’ll also need a notched trowel for spreading that adhesive like a pro. By now, your toolbox should be singing a sweet symphony of readiness. Strap in; it’s time to get this show on the road!
Step-by-Step Installation Guide
So you’ve gathered your tools, psyched yourself up, and now you’re standing there, staring down those empty stairs like a DIY gladiator. It’s game time, folks! But don’t rush into the arena just yet. Let’s walk through this step-by-step, shall we?
First thing’s first: preparation is key. Remove any old carpet, adhesive, or—for Pete’s sake—any stray Lego pieces. Your stairs should be as clean as a whistle and flatter than Kansas. Once that’s out of the way, it’s go time. Measure twice, cut once. That’s the golden rule. Use your tape measure and figure out the dimensions of each stair and riser.
Now, grab that utility knife and start making those cuts. Steady as she goes. Make sure each LVP plank fits like a glove on each stair. You’re laying the groundwork for something that will be stepped on—literally—for years to come, so no shortcuts!
Time to break out the adhesive. Slap it on with your notched trowel. Once you’ve got an even layer, lay down your first piece of LVP. Gentle taps with your rubber mallet will secure it into place. Ah, the sweet sound of progress!
Rinse and repeat for each stair. Don’t forget to place the stair nosing on the edge for that polished look. You know what they say, “The devil’s in the details!”
Last but not least, give yourself a pat on the back. You’ve just stepped up your stair game, my friend! Oh, and let that adhesive dry thoroughly before you start trotting up and down, okay? Safety first, always!
Challenges and Troubleshooting
Ah, the plot thickens! If you thought this was going to be a walk in the park, well, welcome to reality, buddy. Every hero’s journey has its challenges, and yours is no exception. Now, let’s not throw in the towel yet; instead, let’s conquer these hurdles like a pro.
First up, the infamous “crooked stair” issue. Ever put down a piece of LVP only to discover it’s as crooked as a politician? Yeah, no one wants that. So here’s the fix: get your hands on a carpenter’s square. This nifty tool will ensure each piece aligns like soldiers in formation.
Next on the challenge list: the adhesive. Oh, the gooey mess that can quickly turn your project into a sticky situation. Listen, less is more. Overdoing the adhesive will have it oozing out like nacho cheese, causing more harm than good. If you’re in that sticky spot, wipe it off immediately before it dries into an ungodly mess.
And then, of course, there’s the dreaded “bubble trouble.” Imagine laying down your piece, only to see an unsightly bubble. Panic stations? Nah, just use a seam roller to smooth things out. Roll over the bubbled area with some pressure, and voila, problem solved.
Remember, challenges are like spices; they add flavor to the story. So when you run into these hiccups, just take a deep breath and think of them as rites of passage on your way to becoming a stairway superstar. You’ve got this!
Maintenance and Upkeep
So, you’ve done it! You’ve tackled your stairway project like a champ, but before you pop that celebratory bottle, let’s chat about how to keep those steps looking brand spanking new. Trust me, it’s not as daunting as you might think; it just needs a bit of tender loving care.
First off, let’s talk vacuuming. Yes, I can almost hear your groans, but it’s got to be done. A quick sweep with a soft-bristle vacuum attachment will make sure your LVP stairs stay free from the dreaded dirt and grit. Why’s that important? Well, those teeny particles can act like sandpaper, wearing down your shiny new steps over time. Yikes!
Next up is mopping. You’re going to want to opt for a gentle cleaner here—no abrasive chemicals allowed. A simple mix of water and mild soap does the trick. Use a microfiber mop and give your stairs a gentle wipe down. Keep it damp, not soaking, alright? We’re cleaning, not flooding!
Last but not least, let’s talk scratches. They’re the arch-nemesis of any floor, especially if you’ve got little ones or fur babies running around. Consider putting felt pads under furniture and using a no-shoes policy to minimize the risk.
So there you go! With a sprinkle of precaution and a dash of routine care, your LVP stairway will be the envy of the neighborhood. Trust me, a little upkeep goes a long way. Don’t drop the ball now; you’re in the home stretch!
The Pros and Cons Revisited
Alright, let’s circle back to the good, the bad, and the, well, not-so-ugly of having LVP on your stairs. We’ve covered a lot, so it’s time for a recap, a ‘best hits’ playlist if you will, of the pros and cons of this popular flooring option. Trust me, this is the cliff notes version you’ll want to bookmark!
First, the high notes. LVP on stairs? Aesthetically pleasing, oh yes! This stuff mimics hardwood without making your wallet weep. And let’s talk durability. If you have kids or pets, this is like having a superhero shield on your stairs. It’s resistant to scuffs, scratches, and even water damage. Yeah, you heard me, water-resistant on stairs—that’s like having a mini-umbrella for each step!
But, hold your horses. No rose without a thorn, right? Installation can be a tricky beast. Sure, you can DIY, but if you’re not handy, you might find yourself in a sticky situation. And then, there’s the cost. While LVP is generally more wallet-friendly than hardwood, the upfront cost still isn’t pocket change. Last but not least, although it’s durable, it’s not invincible. Heavy furniture can leave an impression, so be mindful!
In a nutshell, LVP on stairs is a solid bet for most homeowners, but it does have its quirks. Weigh your options carefully, folks. The devil’s in the details, but the rewards? Oh, they’re sweet!
Expert Tips and Hacks
So, you’re leaning toward LVP for your stairs, huh? Before you dive in, let’s spice things up with some juicy tips and hacks from the experts—those who’ve been around the LVP block a time or two. These gems are worth their weight in gold, or at least in saved time and hassle. Trust me, you’ll want to keep these in your back pocket.
First off, prep work is your friend. Seriously, it’s like warming up before a workout. Sanding your stairs might seem tedious, but it helps the adhesive stick better. And who doesn’t want that picture-perfect finish, right? Now, speaking of adhesive, go for a high-quality one. Skimping on glue is like buying cheap tires; it won’t end well.
Ever heard of the phrase, “Measure twice, cut once?” Well, when it comes to LVP, measure thrice! Any cutting errors can cost you not just planks but also peace of mind. And hey, if you’re struggling with those odd-shaped stairs, templates are your best friend. Create a cardboard cutout of tricky areas. It’s like having a GPS for your installation process.
And here’s a teaser: Did you know you can actually use a hairdryer to make the LVP more flexible for those challenging nooks and corners? Yep, a hairdryer! Ingenious, right?
There you have it, folks—expert tips that will make your LVP stair project not just easier, but almost fun! So, ready to take the plunge?
Conclusion
And there you have it—a stairway worthy of any grand entrance or dramatic exit! If this post has you stepping up your home improvement game, then our mission is accomplished. Enjoy your revamped “Stairway to Heaven,” (Led Zeppelin) and don’t forget to share your success (or the stumbles we can all learn from) with our cozy community here.
Found this helpful? Give it a thumbs up and share it with your pals. Got a question or your own stairway saga? Drop it in the comments. We’re all ears!
So, what are you waiting for? Grab that toolbelt and make your stairs the talk of the town.
Interesting Articles
Engineered Hardwood vs LVP: The Ultimate Showdown
How Much Does Rug Cleaning Really Cost? – The Faber Rug Company Perspective
